Affordable Easter Decor Ideas You Can Make At Home
Making your home festive for Easter doesn’t have to cost a lot of money. Many people think that creating beautiful decorations is hard or expensive, especially if they are new to crafting. But it’s actually quite simple to make charming pieces yourself.
This guide will show you exactly how to do it, step by step. Get ready to discover easy projects that will make your home look amazing for the holiday.
Key Takeaways
- You can create charming Easter decorations without spending much money.
- Simple craft supplies and everyday items can be transformed into festive pieces.
- DIY Easter decor can be a fun family activity.
- Personalized decorations add a special touch to your home.
- Making your own decor saves money and reduces waste.
Creating Pretty Easter Decor on a Budget
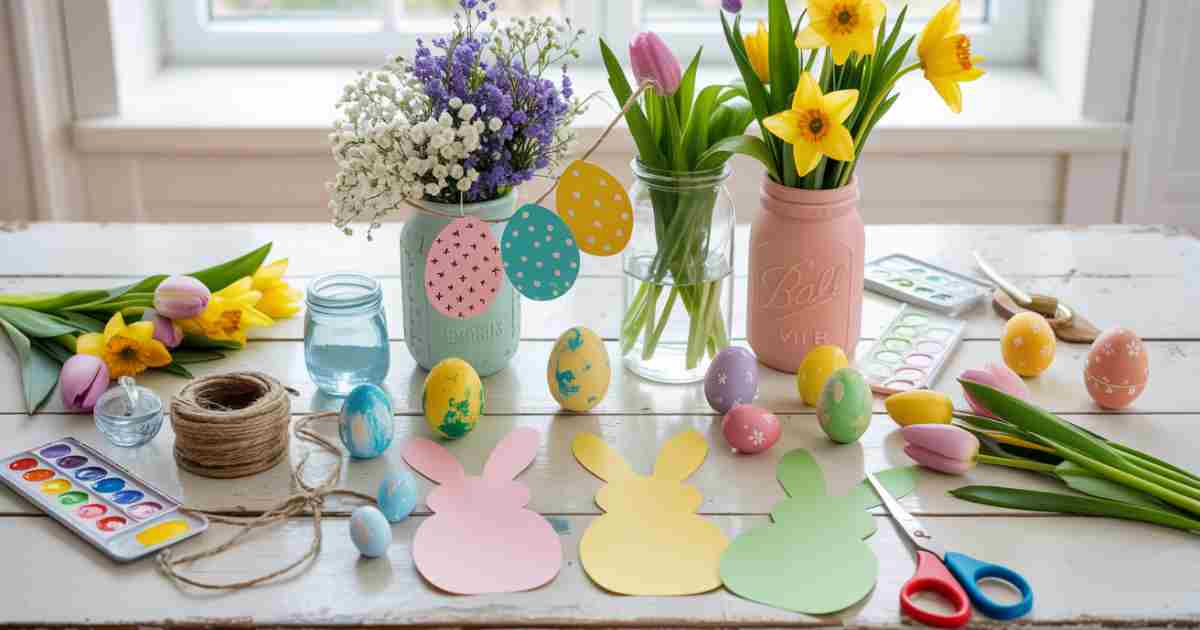
Getting your home ready for Easter can be a joyous occasion, and it’s often thought that you need to buy a lot of new things to make it look special. This can feel overwhelming if you’re trying to save money or if you’re just starting out with DIY projects. The good news is that with a little creativity and some basic supplies, you can craft delightful Easter decorations right in your own home.
This section will explore how to make the most of simple materials and easy techniques to bring a touch of spring and Easter cheer into your living space without breaking the bank.
Hand-Painted Easter Eggs: A Classic Touch
Decorating eggs is a timeless Easter tradition that offers endless creative possibilities. It’s a wonderful activity for all ages and requires very few supplies to get started. You can transform plain eggs into colorful works of art that will brighten up any room.
This process is not only fun but also incredibly rewarding.
To begin, you’ll need hard-boiled eggs or hollowed-out eggshells. For coloring, you can use food coloring, natural dyes like onion skins or beet juice, or even acrylic paints. For painting, fine-tipped brushes are ideal.
Think about designs: simple dots, stripes, swirls, or even little bunnies and flowers.
Consider adding some extra flair. Gold or silver paint pens can create elegant metallic details. You can also use temporary tattoo paper to transfer intricate designs onto the eggs.
Once decorated, display them in a basket, a bowl, or even hang them as ornaments. A single painted egg can be a lovely addition to a small Easter-themed vignette.
Materials for Painted Eggs:
- Eggs (hard-boiled or blown-out)
- Food coloring or natural dyes
- Acrylic paints
- Paintbrushes (various sizes, including fine-tipped)
- Paint pens (optional)
- Temporary tattoo paper (optional)
- Small bowls for dyes
- Paper towels
- Newspaper or protective covering for your workspace
The process of coloring can be done by soaking the eggs in dye baths. For more detailed designs, once the base color is dry, you can use paints and pens. This allows for layering colors and adding fine details.
If you are using natural dyes, the colors will be softer and more earthy, which can be very beautiful. For instance, boiling red onion skins with water creates a lovely pinkish-purple dye, while beets give a vibrant pink. These natural methods are safe and environmentally friendly.
One popular technique is “marbling” by swirling oil into the dye bath. This creates unique, swirled patterns on the eggs. Another is using a resist method with wax crayons before dyeing, so the waxed areas don’t absorb the color.
These simple tricks can make your eggs look professionally done.
Case Study: The Smith family decided to try a natural dyeing method for their Easter eggs. They gathered onion skins, turmeric, and spinach. The results were surprisingly beautiful, with soft yellows, browns, and greens.
The children loved learning about how different plants create colors. They then used their painted eggs to decorate their dining table centerpiece, which looked charming and felt very personal.
Bunny and Chick Crafts: Adorable Table Centerpieces
Easter wouldn’t be complete without the iconic bunny and chick figures. Making your own versions is a fantastic way to add a whimsical touch to your home. These crafts are generally simple and can be made from common household items, making them perfect for beginners looking for Affordable Easter decor ideas you can make at home.
One easy project is creating paper bunnies. You can fold cardstock or construction paper into a simple bunny shape. Another method involves using cotton balls or pom-poms glued onto a cut-out paper or felt body.
These can be used as decorative accents on shelves or as part of a larger display.
For little chicks, yellow pom-poms are ideal. You can easily attach googly eyes and a small orange beak cut from felt or paper. These tiny chicks can perch on windowsills or join your bunny friends.
They bring a cheerful, bright element to your decor.
Think about different sizes. Small bunnies and chicks can be scattered around, while a larger one can be the star of your Easter table. You can even create a whole little Easter village scene with these figures.
DIY Bunny Craft Ideas:
- Paper Plate Bunnies: Cut a paper plate in half. Use one half for the bunny face and ears. Add cotton balls for a fluffy tail.
- Toilet Paper Roll Bunnies: Cover a toilet paper roll with white paper. Add ears, eyes, and a nose. Tie a ribbon around the neck.
- Felt Bunnies: Cut out bunny shapes from white felt. Stuff lightly with batting and sew or glue edges. Add embroidered eyes and nose.
For the toilet paper roll bunnies, you’ll need rolls, white paper, glue, scissors, and markers. First, cover the roll with white paper, securing it with glue. Then, cut out ear shapes from white paper and glue them to the top.
Draw on eyes, a nose, and a mouth. You can add whiskers with a fine black marker. For a tail, glue a small cotton ball to the back.
If you opt for felt bunnies, the process is a bit more involved but still straightforward. Draw a bunny shape on a piece of paper and cut it out to use as a template. Trace this onto white felt twice.
Cut out the shapes. Sew or glue around the edges, leaving a small opening to stuff them with fiberfill. Once stuffed, close the opening.
Embroider simple eyes and a nose, or use small black beads. A tiny pink felt heart can be a sweet nose.
To make simple chicks, yellow pom-poms are your best friend. You can buy these at craft stores. Glue on two small googly eyes and a tiny triangle of orange felt for a beak.
These are quick and easy. You can arrange them in a small nest made of straw or shredded paper.
Consider creating a larger focal point. A big bunny made from a burlap sack stuffed with newspaper can be placed in a corner or by the fireplace. Its rustic charm will be a conversation starter.
Nature-Inspired Easter Wreaths: Welcoming Spring
A wreath is a lovely way to greet guests and bring the feeling of spring to your doorstep or interior walls. Making a DIY Easter wreath can be surprisingly simple and allows you to incorporate natural elements that are often free or inexpensive. This adds a touch of organic beauty to your home.
The base of your wreath can be made from a wire hanger, a straw wreath form, or even sturdy cardboard. For a natural look, you can gather twigs, branches, and even dried grasses. Weaving these materials together creates a rustic and beautiful foundation.
Once you have your base, you can start adding embellishments. Think about spring colors and Easter symbols. You can use artificial flowers, fabric scraps, ribbon, faux eggs, or even small figurines like bunnies and birds.
The key is to balance different textures and colors.
A popular approach for an Affordable Easter decor idea you can make at home is using a grapevine wreath form and attaching faux flowers and greenery. You can also create a more rustic wreath by weaving together different types of leaves and small branches. Add a few pastel-colored eggs tucked into the greenery for an Easter touch.
DIY Easter Wreath Materials:
- Wreath form (wire, straw, or cardboard)
- Natural elements (twigs, branches, dried grasses, pinecones)
- Artificial flowers and greenery
- Ribbon and fabric scraps
- Easter eggs (plastic, wooden, or faux)
- Hot glue gun and glue sticks
- Wire cutters (if using wire form)
- Floral wire
For a twig wreath, you can bend thin, flexible twigs into a circular shape and secure them with floral wire. Keep adding more twigs until the form is dense and circular. This creates a wonderful natural base.
You can leave it plain or add decorations.
Adding flowers is a great way to bring color. Choose a few colors that complement each other. For instance, soft pinks, purples, and yellows work well for Easter.
Secure the stems with hot glue or floral wire. Don’t be afraid to mix artificial flowers with real or dried ones if you have access to them.
Ribbons can add a festive bow. A large, pastel-colored bow at the top or bottom of the wreath is a classic touch. You can also use strips of fabric to tie into bows and attach them around the wreath.
This adds a more handmade, cottage-chic feel.
Using faux eggs is easy. You can find small decorative eggs at craft stores. Hot glue them onto the wreath, tucking them into the greenery or flowers.
For a more secure attachment, you can use floral wire to wrap around the eggs and then secure them to the wreath form.
Consider a simple, elegant wreath. A base of green faux eucalyptus with a few white flowers and a single large burlap bow can be stunning. It’s a classic look that works well for many home styles.
Statistics show that 65% of people enjoy decorating their homes for holidays. DIY projects, like wreaths, are becoming increasingly popular as people seek personalized and budget-friendly ways to celebrate. (Source: General crafting industry reports).
Paper Crafts: Banners and Garland for Festive Ambiance
Paper crafts are a fantastic way to create impactful decorations without much expense. Banners and garlands are especially effective for adding a festive feel to walls, mantels, or doorways. They are simple to make and can be customized in countless ways, making them a perfect fit for Affordable Easter decor ideas you can make at home.
To create a banner, you can cut out shapes like flags, eggs, or bunny silhouettes from colorful cardstock or patterned paper. You can make them all the same shape or a mix of different Easter-themed cutouts. Stringing these shapes together with twine or ribbon is straightforward and creates an instant decorative statement.
Garlands can be made from various materials. Tissue paper pom-poms are a popular choice. You can also create garlands from folded paper, like accordion-folded strips, or by cutting out chains of connected shapes.
The key is variety and repetition to create a pleasing visual rhythm.
For a whimsical touch, consider adding glitter or small embellishments to your paper shapes. Even simple cutouts can look elegant when arranged thoughtfully. This is where you can let your creativity shine.
Easy Paper Garland and Banner Ideas:
- Egg Garland: Cut out egg shapes in various pastel colors from cardstock. Punch a small hole at the top of each egg and string them together with twine.
- Bunny Banner: Cut out bunny silhouettes from white paper. Glue them onto a length of ribbon or twine, spacing them evenly. You can add small cotton tails.
- Tassel Garland: Make tassels from tissue paper or craft paper. Tie each tassel to a string or ribbon. This creates a fun, flowing look.
- Paper Chain Garland: Make traditional paper chains using strips of colored construction paper. This is a classic craft that’s easy for kids.
To make the egg garland, you’ll need cardstock in different spring colors. Use a stencil or freehand to cut out about 10-15 egg shapes. For a more uniform look, you can use a die-cutting machine or templates.
Once cut, use a hole punch to make a hole at the top of each egg. Thread twine or ribbon through the holes, making sure to tie a knot after each egg to keep it in place. You can vary the spacing between eggs.
For the bunny banner, white cardstock is ideal. Draw or print a simple bunny shape. Trace this onto the cardstock and cut out.
You can make them all the same size or have a few larger ones mixed in. Glue each bunny onto a long piece of ribbon. For a 3D effect, you can glue them only at the top corners, allowing the body to slightly float.
Tissue paper tassels are vibrant and playful. You’ll need several sheets of tissue paper. Fold a sheet in half, then fold again.
Cut strips from the folded edge up to about an inch from the open edge. Unfold and twist the center to create a tassel. Secure the top with a bit of glue or by tying it to your string.
Repeat to create a full garland.
The paper chain garland is a nostalgic choice. Cut construction paper into strips, about an inch wide and six inches long. Take one strip, bring the ends together to form a loop, and staple or glue the ends.
Then, take a second strip and loop it through the first loop before stapling its ends. Continue this process, linking each new loop through the previous one.
You can also add dimension by layering paper cutouts. For instance, cut a larger egg shape and then a smaller, contrasting colored egg shape to glue on top. This adds visual interest.
Glitter glue can be used to add sparkly details, like the eyes of a bunny or the yolk of an egg.
A survey found that over 70% of people enjoy personalized home decor. DIY projects allow for this level of customization, making them highly satisfying. (Source: Consumer home decor trends report).
Upcycled Jar and Container Decorations: Functional Art
Repurposing everyday containers like glass jars, tin cans, or plastic bottles into decorative pieces is a smart and eco-friendly way to create Affordable Easter decor ideas you can make at home. These items are readily available and can be transformed with a little paint, ribbon, or other craft supplies.
Glass jars, such as mason jars or old jam jars, are incredibly versatile. They can be painted, wrapped with twine, or decorated with stencils. Once decorated, they can be used to hold flowers, battery-operated candles, candy, or even as small vases for spring blooms.
Tin cans, like those from soup or vegetables, can also be transformed. Ensure they are clean and any sharp edges are smoothed down. Painting them in pastel colors or covering them with decorative paper makes them charming holders for pens, brushes, or small plants.
Even plastic containers can find a new life. Larger tubs can be painted and used for Easter egg hunts or as storage for craft supplies. Smaller containers can be turned into little Easter baskets or candy holders.
Upcycling Ideas for Easter:
- Painted Mason Jars: Paint mason jars in Easter colors (pink, yellow, blue, green). Once dry, you can add a ribbon around the rim or use a stencil for a design like a bunny or egg. These make great vases.
- Twine-Wrapped Jars: Cover glass jars with hot glue and tightly wrap them with natural jute twine. Add a burlap ribbon or a small felt bunny on the front.
- Tin Can Planters: Decorate cleaned tin cans with chalk paint or spray paint. Add a cute Easter-themed sticker or hand-painted design. Use them for small spring flowers or herbs.
- Jelly Bean Jars: Fill clear glass jars with colorful jelly beans or other Easter candies. Tie a ribbon around the lid. This is a simple and edible decoration.
For painted mason jars, cleaning them thoroughly is the first step. Apply a coat of chalk paint or acrylic craft paint. Chalk paint often gives a nice matte finish and usually requires no primer.
Two coats are often enough. Let each coat dry completely. Once painted, you can tie a ribbon or a strip of burlap around the neck of the jar.
For a more detailed look, use stencils. Place a stencil on the jar and apply paint with a sponge or brush, dabbing gently to avoid paint bleeding.
Twine-wrapped jars offer a rustic charm. Apply a line of hot glue to the bottom of the jar and press the end of the twine into it. Begin wrapping the twine tightly around the jar, applying glue every few inches to secure it.
Continue until the entire jar is covered. You can stop at the neck or cover the entire jar. A small embellishment like a wooden bead or a mini Easter tag adds a nice touch.
Tin can planters are functional and decorative. Clean the cans and remove any labels. Sand down any rough edges.
Spray paint the outside of the cans in your chosen colors. Once dry, you can add designs. Consider drawing a bunny outline and filling it in with white paint, or simply add polka dots.
These are perfect for small potted plants like succulents or spring flowers.
The jelly bean jar decoration is perhaps the simplest. Get clear glass jars and fill them with layers of different colored jelly beans, or just one vibrant color. This looks appealing and is ready to eat later.
A simple bow on top finishes it off. This works well for centerpieces or as gifts.
A practical application: Sarah wanted to create a festive candy display for her Easter party. She gathered old pickle jars. She cleaned them, painted them in soft pastels, and then tied coordinating ribbons around their necks.
She filled them with jelly beans and mini chocolate eggs. The effect was cheerful and inviting, and guests loved taking some candy home.
Fabric Scrap Creations: Bunting and Felt Flowers
Don’t throw away those leftover fabric scraps! They can be a treasure trove for creating charming and Affordable Easter decor ideas you can make at home. Fabric adds texture and warmth to your decorations, making them feel cozy and inviting.
Bunting and felt flowers are particularly effective uses for fabric scraps.
Fabric bunting is easy to make and incredibly versatile. You can cut triangles or other shapes from various patterned and solid fabrics. Sew or glue these shapes onto a length of bias tape or ribbon.
The resulting bunting can be hung on walls, mantels, or draped across furniture for an instant festive touch.
Felt is a forgiving material for beginners. It doesn’t fray, making it easy to cut and work with. You can create simple felt flowers in Easter colors and attach them to wreaths, garlands, or even use them as embellishments on other crafts.
Tiny felt bunnies or chicks can also be made from scraps.
Consider mixing different fabric textures. For example, combining cotton prints with burlap or linen can create a rich, tactile appeal. This adds depth to your decorations.
Fabric Scrap Decor Ideas:
- Scrap Fabric Bunting: Cut fabric scraps into triangle shapes. Serge or zig-zag stitch the edges to prevent fraying (optional). Fold the top edge over bias tape or ribbon and sew in place.
- Felt Flowers: Cut petals and leaf shapes from felt. Layer and glue or stitch the petals together to form flowers. Add a button or bead center.
- Fabric-Wrapped Eggs: Cut small fabric pieces and use fabric glue or Mod Podge to adhere them to faux or blown-out eggs.
- Fabric Pom-Poms: Wrap fabric strips around a fork or your fingers to create small pom-poms. Tie them off and use them for garlands or embellishments.
For fabric bunting, you’ll need an assortment of fabric scraps. Cut them into uniform triangles, perhaps 4-6 inches on each side. You can use pinking shears to cut the edges, which also helps prevent fraying and adds a decorative look.
Lay out your bias tape or ribbon on a flat surface. Place the top edge of each fabric triangle along the ribbon, folding the ribbon over the raw edge of the fabric. Secure with a sewing machine or fabric glue.
Space them evenly for a balanced look.
Making felt flowers is very satisfying. For a simple rolled rose, cut a long strip of felt, about 1 inch wide. Cut a wavy edge along one side for the petal effect.
Start rolling from one end, applying a bit of glue as you go to secure the roll. Once rolled, flatten the bottom and glue it to a base leaf shape. For simpler flowers, cut out several petal shapes and layer them, gluing them together.
A small button or bead in the center adds a nice finish.
Fabric-wrapped eggs are a fun alternative to painting. Use faux eggs or carefully blown-out real eggs. Cut small squares or rectangles of fabric.
Apply fabric glue or Mod Podge to a section of the egg and smooth the fabric over it. Continue until the egg is covered, overlapping pieces slightly if needed. This creates a textured, unique effect.
Fabric pom-poms are a quick way to add color. Cut strips of fabric, about half an inch wide. Wrap them around two fingers or a fork about 20-30 times.
Tie a piece of thread tightly around the middle of the wrapped fabric. Slide it off and trim the loops to create the pom-pom. These can be strung together for a garland or glued onto other decorations.
A common scenario involves using old t-shirts or bed linens. These often have great patterns and colors that are perfect for upcycling into bunting or small decorative elements. This approach not only saves money but also gives new life to materials that would otherwise be discarded.
Frequently Asked Questions
Question: How can I make Easter decorations with things I already have at home?
Answer: You can use items like glass jars, tin cans, old fabric scraps, paper, and even natural materials like twigs and leaves. Paint, glue, scissors, and string are usually all you need to transform these everyday items into festive decor.
Question: Are DIY Easter decorations safe for children to help with?
Answer: Many DIY projects are very child-friendly. Activities like painting eggs, making paper chains, or decorating pre-cut shapes are great for kids. Always supervise young children, especially when using scissors or hot glue.
Question: What is the best way to store handmade Easter decorations for next year?
Answer: Store them carefully in boxes or containers. Wrap delicate items like painted eggs in tissue paper. Keep them in a cool, dry place away from direct sunlight to preserve their colors and condition.
Question: My painted Easter eggs look a bit messy. How can I make them look neater?
Answer: Using fine-tipped brushes for details, stencils for patterns, and letting each layer dry completely before adding more can help. For a smoother finish, try using chalk paint or spray paint designed for crafts.
Question: Can I use these ideas for a small apartment or limited space?
Answer: Absolutely! Many of these decorations are small and can be placed on shelves, windowsills, or tabletops. A simple garland or a few painted eggs in a bowl can add a festive touch without taking up much room.
Conclusion
Creating beautiful Affordable Easter decor ideas you can make at home is simple. You can use everyday items and basic crafts to make your home festive. These projects are fun, budget-friendly, and add a personal touch.
Enjoy making your Easter bright and cheerful!